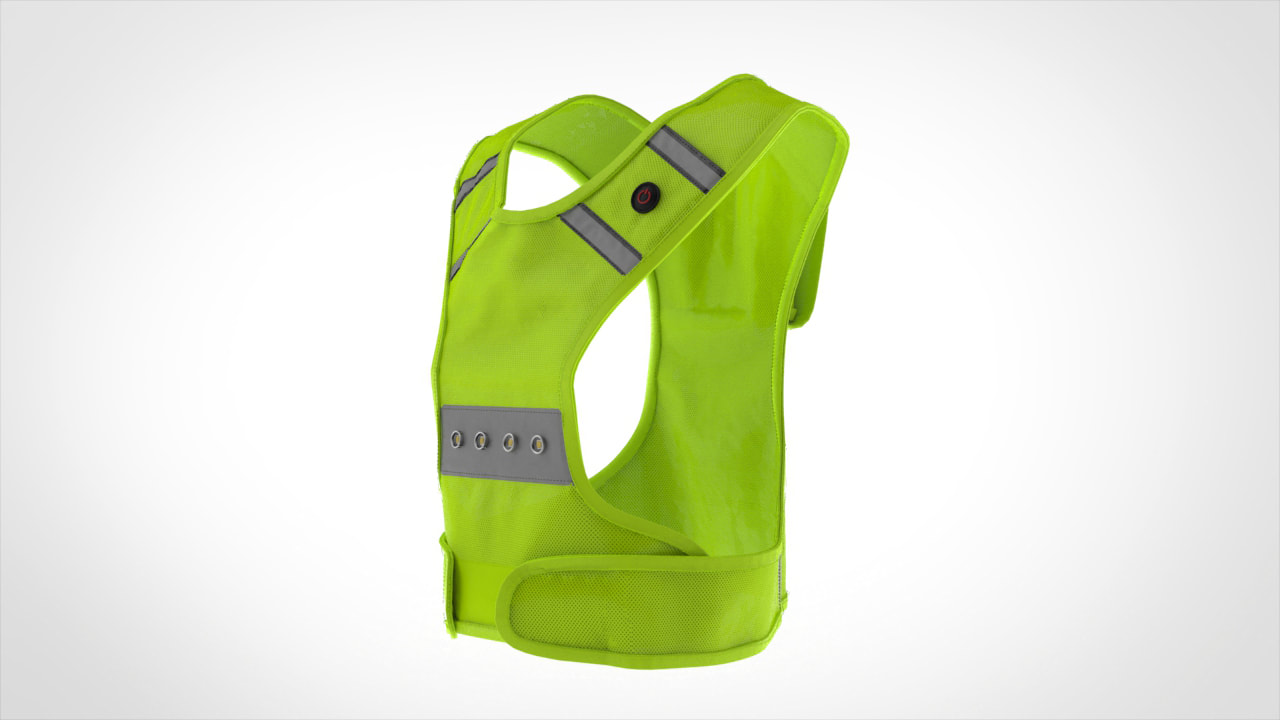
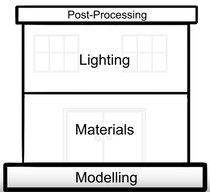
  Getting to Today I launched Fireflyline in 2015 with the goal to streamline the product development process. 3D prototypes are serving us well to help clients develop the best products with minimal sampling and improve fit. 3D has become integral to the patternmaking process at Fireflyline. Basic 3D virtual prototypes allow our clients to get an initial idea if their designs are working as desired. Clients appreciate the chance to review and make adjustments before proceeding with physical samples. The design process is iterative and changes are natural. Using 3D has allowed us to move up the stage at which changes are made within the development cycle. Along the way the software we used improved and so have our skills. The virtual prototypes are looking more and more like the physical prototype. We have reached a point where the 3D digital prototype can be used as basic product photography for most apparel types. I use EFI/Optitex software for the bulk of the work to model clothing. When Fireflyline launched Optitex was on Version 15. Last fall we updated to Version 18. During that time the ability to add accurate stitching, use multiple fabric layers without layers colliding, and the accuracy of the fabric shaders/textures has all improved dramatically. Competitive software suppliers such as Browzwear and Clo3D have also made improvements during the same time period. We also stepped out of (or beyond) Optitex for some projects. Working entirely in Optitex for efficiency of development makes complete sense and streamlines the workflow. Yet, for certain projects I wanted more control over the shaders/textures, lighting, and animation. I have been using Keyshot to render models created in Optitex for select projects. There are numerous pros and cons but overall, I like the tool and the results. We also use traditional 3D modeling software to model rigid trims. Keyshot then allows us to realistically render plastics, metal, painted surfaces, and glass. The Ikea catalog is primarily composed of 3D images and has been for several years. There is really no reason why apparel companies can’t do the same for many uses. Majority of e-commerce websites now show the garment without a model for the primary shot. Building Blocks to Photorealism Most apparel companies are approaching 3D as a one stop shop. They purchase software from a single provider and expect the tool to take them from start to finish. The wisest companies realize they need a suite of tools and a variety of skill sets using those tools. I love this image featured in this video by Blender Guru depicting the four building blocks to photorealism. Creating the model of the garment takes the bulk of my time, but accurate materials and lighting are critical to realistic images. The 3D model is only the groundwork for achieving photorealism. Let’s walk through the steps used to create client Constantia Gear’s Disco vest. 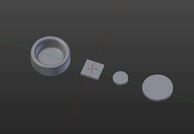 Light Components 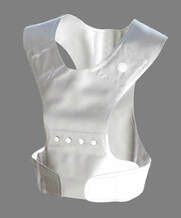 Optitex Model for Export 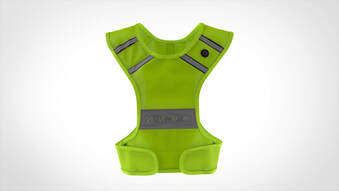 Rendered in Keyshot The lights and power button were modeled in Blender, a traditional 3D modeling software. Each component of the lights is created so that a separate material can be applied to each later. The 2D vest pattern is digitally stitched in Optitex. The hard trims are placed on the model in Optitex. The model is exported from Optitex into Keyshot. Each component of the vest has a material assigned. Colors and shaders are adjusted to accurately represent the physical materials. The appropriate lighting and environment are selected in Keyshot. In this case an indoor studio scenario was used. The lighting used for the 3D image should match the type of lighting a photographer would select for the same scenario. I never complete all steps at once. I’ll finish the model, step away awhile, and then return to do a quality check before exporting and rendering. I often come up with solutions to difficulties while I’m away from the 3D process. Innovation is hard. Not everything works. I spend a crazy amount of time experimenting. Software support staff have been great to offer suggestions to difficulties. But we are sometimes pushing the boundaries of what the software is currently capable of achieving. During this process I’m exchanging images with the client for feedback to achieve exactly what they want. Clients need to advise how they want the garment styled and the type of images they desire. (Note, the software I use at Fireflyline might not be the best selection for everyone. There are a lot of software tools available and some will work better in combination than others. If you are exploring the 3D process, look for the options that work best for you.) Are We There Yet
Have we reached photorealism? Not by my standards, but I’m my toughest critic. However, I think we have reached a point where the average consumer believes the image is the actual product. I wouldn’t currently try to replace lifestyle photography with 3D images, but for ghost photography or shots on a mannequin, 3D digital creations can be realistic. Lighting and shaders/textures look better with every experiment. There are software options available to scan or photograph actual materials to create shaders such as Vizoo and Materialize. I also experiment with altering and combining existing shaders to achieve the correct appearance. Styling the garments can be difficult. Stylists on photoshoots can pin and tweak the appearance of a garment in ways we can’t do in 3D. I cannot quickly switch between buttoned vs unbuttoned, hood up vs hood down, cuffed vs uncuffed. Those options require two completely different 3D models. Using 3D prototypes requires communication, just like the photography process. Communicating with stylists and photographers to plan a shoot requires a shot list, examples of how the product should be styled, and ideas of the mood you want to create. All the same information is required to create a 3D rendered image that you will like. Do not embark down the road of using 3D digital creation to replace photography with the goal of saving time on communication. Advantages Creating a single colorway in 3D may not offer a huge advantage over ghost photography. However, the savings will increase dramatically if there are multiple colors and fabrics planned for a single product. Ghost photography requires multiple photos be taken and several steps in post production. Generally, this must be done for every color. Adding additional colors in 3D is handled in a matter of minutes. Instead of taking new photos of a physical sample and going through the post processing steps again, I can change the RGB codes of the materials and render the new image. If you add a second fabric, the process is similar. As long as the material drapes the same, we only need to change the texture of the render. This can be time consuming a first, but as a library of materials is established the process becomes more efficient. Road Blocks to Progress I would love to see more open communication among those using 3D prototypes for apparel. The problem is usually I and others are working on styles that will not launch for six to twelve months. We cannot share the 3D prototypes with the public until the product launches and by the time we can our capabilities have expanded. I do not want to showcase what I could do six months ago. I want potential clients to see what can be done today. Majority of the images we create for marketing purposes are solely for that purpose, which is additional work. Companies are also hesitant to share because they feel what they have learned and their workflow is a competitive advantage. Fireflyline is in a unique situation because our clients come to us so they do not have to learn new skills or to get up and running in 3D faster. We also do not hesitate to share those skills with corporate clients because doing so builds strong relationships. Unlike many software systems with loads of users there is not a large user community with forums to ask questions and exchange information with peers. Peers, if you are out there and working in 3D for apparel development, please connect!
0 Comments
 You have been investigating 3D prototype software for your clothing business. The advantages to using 3D virtual samples look pretty appealing and you have identified some of the benefits. You may have even seen a couple presentations from software companies. Now you are wondering, what else do I need to ask? There are other issues to consider and include in a budget to implement the software.
Adding 3D software is a great advantage, but must be planned for as a process change. You are not simply adding a new software tool. Gaining full advantage of all the potential revenue generating and cost savings opportunities will require you to make changes to your product development process and have a plan in place to assist your staff in making the adjustment to 3D. Before diving into planning your 3D implementation, here is a reminder of the potential benefits. You can use this list to analyze and quantify the potential benefits to your particular organization. Revenue Generating or Savings Opportunities
Less Tangible Benefits
The benefits can be great! Now you need to consider the related processes that need to change and form a plan for implementation. Who will use the software and how? The individuals who actually operate the software need a particular set of skills. Most organizations use technical designers or pattern-makers because they already have much of the required knowledge. You also need to consider if you can afford to take those individuals away from their current responsibilities or will you need additional staff. Will the benefits such as a reduction in fit samples to review, eventually balance the workload? Skills needed to operate a 3D pattern-making software:
Do you want someone fully dedicated to using the software or will the current staff be expected to use the software as part of their daily tasks? Floating licenses are usually an option. Do you want to purchase ten licenses and share those among forty technical designers who will each use the software an hour a day? Or do you buy five licenses and have five fully dedicated virtual technical designers. Both approaches work, but you need to figure out which works best for your organization. Do not forget to calculate the time and cost for training. Regardless if someone uses the software all the time or a couple times per week, they will need full training. Will the design team directly use the software? Many of the 3D options now offer additional software or plug-ins to Adobe Illustrator, which allows design to utilize the software without learning all the functions. Do you need staff trained to use traditional 3D modeling or rendering software? Will you be using the 3D models for customer or client presentations? If so, the rendering capabilities of the apparel 3D software may need a boost by using a separate rendering software. Or if you use many custom trims you may need someone familiar with traditional 3D modeling to model trims. Am I removing steps in the development process? You are adding at least two steps; creating a 3D virtual sample and reviewing a 3D virtual sample. You will be able to review artwork scale, color variations, and style variations much faster in 3D. Your goal might be to replace some physical samples. Or you may review many more variations of a style because it is now faster in 3D. Make sure everyone is aware of your goal(s) and why you are implementing 3D. Plan the new steps into the development process. When you first start the 3D model will likely be a pilot alongside the normal process. As you prove the success of 3D you can phase into a more streamlined process, replacing physical samples with virtual samples. Do I have support from all the necessary departments and functions? Treat the implementation of 3D virtual samples as a broader process change. Make sure you have support from leadership of all the departments involved. Take the opportunity to demonstrate the benefits to each of the departments before rolling out the change. In addition to those using the software directly, many others will be involved in reviewing the virtual samples or providing supporting information. Design and merchandising must be comfortable reviewing 3D virtual samples in place of physical samples. Who will be involved:
Consider the software limitations Make sure everyone understands the software limitations. For instance, because a 3D pattern-making system utilizes the 2D pattern to make a model; sweaters cannot be modeled in 3D. Some of the software options are better than others at insulated garments, representing hard trims, and draped or tied pieces. Footwear and rigid accessories will need to be modeled in a different type of software. Make sure you educate all the stakeholders on the limitations of the software. You do not want to wait for a major meeting for someone to learn what cannot be modeled in 3D. What hardware or additional software do we need? Verify if your current workstations will support the 3D software. You may need to make upgrades or completely replace some workstations or laptops. If you will be presenting the 3D virtual samples in place of physical samples, make sure the presentation equipment is sufficient to showcase the virtual sample. How are you going to test materials to be sure they are accurately represented in the software system? Some software companies provide testing as a service. Others sell hardware packages to allow you to test your materials. Will you need to create specific rigid parts, such as zipper pulls or buckles? If so, does your company have an existing license for a 3D modeling software that can create those parts. If not, include one in your budget and do not forget to figure out who will be trained to use the software. If you are already using 3D modeling to develop footwear, can someone from that team handle creating apparel trims? If you plan to use the 3D virtual samples for marketing, you may want to investigate animating the clothing or the avatars. The 3D pattern-making software may have some animation capability, but you may want to invest in a program capable of more complex animation. Many of the 3D softwares used for apparel and sewn accessories now include photoreal rendering. If you plan to use the images to replace product images on your website, are you satisfied with the rendering ability or do you need further control? An additional rendering software may give you more control over camera and light positions. Some of the traditional 3D modeling software options have complex rendering engines built in. Examples of traditional 3D modeling / render tools: Photorealistic images are dependent upon accurate textures and shaders. Verify if the library within the software is sufficient or will you need to create and load your own textures? Existing libraries catering to 3D creators have focused on hard goods. Chances are you will need to capture some of your own fabric textures and create seamless images or shaders that can be uploaded to your 3D system. Depending on your planned end use for 3D, you may need a photo box, a scanner, or software. Don’t panic. Any of the above needs can also be outsourced. There are many freelancers available using traditional 3D modeling that can create hard trims. Vizoo, offers to scan and create seamless textures as a service in addition to selling hardware and software. But do not plan on finding a technical designer or pattern-maker who also has skills in traditional 3D modeling. Up until now, no one person has needed both of those skills! We want you to be successful Adding 3D sampling to your development process can have huge advantages if implemented successfully. There are companies experiencing these advantages. There are also those who bought software licenses which are now sitting idle due to lack of planning. An exciting opportunity should not become a struggle. Fireflyline offers 3D sampling as a service. We can help you test the process and generate excitement before fully adopting a new process. We can also help you plan for implementing 3D. I have a background in both technical design and project management. I can help you develop a pilot plan followed by a full implementation plan. Fireflyline uses Optitex but we have no obligation to a particular software company. 3D pattern-making and sampling will someday be an industry norm; a part of nearly every apparel product development organization. Before that day comes we want to make the process more accessible and ease the transition. We would love to hear from you if you have been contemplating adding 3D virtual samples to your development process. Technical designers are a connecting thread in the product development process. They spend their days communicating designs to factories and making sure the designers vision is carried out. So what happens to their role as technology allows faster and easier visual communication?
I've heard some thought provoking questions lately around what skills are needed for those looking to start careers in pattern-making or technical design today. ⦁ Are companies looking for individuals with digital pattern-making and 3D design experience? ⦁ How do you identify if someone has the skills to work in Technical Design? What skills are needed for 3D pattern-making or prototyping? The beginning Let's take a step back. Technical design as a career path took hold in the nineties. As companies off-shored garment production, they realized pattern-making could also move overseas. To effectively communicate with overseas pattern-makers a new role emerged. Someone who was responsible for technical communication between US designers and the overseas technical staff. Some pattern-makers moved into these roles, but also individuals with design backgrounds who were comfortable with fit and garment construction. At the same time, the industry was beginning to take advantage of digital communication. Product specifications could be sent via e-mail in seconds instead of faxed page by page. Those with years of experience hand sketching learned to sketch with Adobe Illustrator. Digital cameras allowed images of fittings and products to be captured and transmitted quickly. Today Technical designers today range in responsibilities and skills. Some companies require adept pattern-makers capable of correcting patterns and evaluating grading. Other companies expect technical designers to communicate issues to the factories and allow the factories to determine how to correct the fit problems. Some technical designers work on only fit while others may need a strong knowledge of garment construction, manufacturing methods, quality testing, labeling regulations, color, fabric, and trims. The technology at each company ranges from creating specifications in Excel to highly customized Product Lifecyle Management (PLM) systems and 3D pattern-making. PLM software has been in wide use for many years. However, many companies have only recently began to leverage the ability to manage tasks or utilize the systems to directly communicate with suppliers. Task notifications can be sent to factories and factories can enter information directly into PLM systems. A few leading retailers have already learned the advantages of 3D design or pattern-making systems, while others are beginning to pilot systems. WhichPLM has done a great job of recapping excitement around 3D at the recent PI Apparel conference. A few roles as virtual technical designer have emerged, both within corporations and individual firms like Fireflyline. Generally, technical designers and pattern-makers are asked to learn 3D while maintaining their other duties. The future Technical design five to ten years from now will look very different from today. The development specification including measurements, construction information, and images will be gone. All this information can be condensed into a 3D file. The desired stitching can be communicated via the 3D image. The measurements, fabric, and color information can be included in the file or integrated with a PLM system. 3D software providers are beginning to form strategic partnerships with PLM providers to accomplish this integration. Currently, 3D is primarily used as a prototyping tool, but the advantages of designing directly in the system will quickly be learned. Software will evolve to make it easier for designers and pattern-makers to collaborate. Browzwear has two separate systems; V-stitcher to create the 3D prototype from the 2D pattern and Lotta for designers to review stitch details, prints, and embellishments. The role of designer and technical designer may merge. Designers will desire to use 3D modeling tools so they can adjust proportion and scale of style lines, pockets, and prints or graphics directly. Why wait to see a sample and then need to communicate to shift a yoke seam or change a pocket size? Will a production measurement specification be needed? Perhaps not. Someone may develop an app allowing depth sensing cameras or scanners to measure production garments compared to development garments or specifications. The best technical designers will be those who find new ways to use the technology available to them. Companies utilizing 3D are investing time in training staff. They are also beginning to partner with colleges to ask that 2D and 3D pattern-making be implemented into the curriculum. Individuals are realizing the breadth of tools available are not only those created for the industry but also the everyday tools they use to communicate. Smart phones, tablets, Skype, and other communication applications allow us to visually communicate with the other side of the world easier than ever. The next post will focus on training and development of apparel professionals and students to prepare them for this exciting future. |