|
I still meet designers pretending they don’t need technical packages. I say pretending because they know they should have a tech pack but they either don’t have time to create a tech pack or don’t know where to start. I hear statements like; “I’m working with a local factory, they said they don’t need one”. “I don’t know how and no one has asked for one”. So, what is a tech pack and why do you need one? The tech pack is a written document that contains information about an apparel style. You will also here it called a specification or spec, Some people refer to the spec as only the finished garment measurements. There are usually a few key elements to a full technical package:
Illustrations The minimum of illustrations is the front and back of the garment. The sketches should include all construction elements, such as topstitching. The sketches should be black and white so all the details can be clearly seen and interpreted. If you want to include colored images, those should be on an additional page. Other images you might include:
Construction There are two primary ways to handle construction in a tech pack. The first is to show the visible construction elements on the illustrations and add callouts showing key construction elements like the width of the hem or topstitch. This method is followed by most retailers in the US and allows the factory engineer to finalize the actual order of operations. 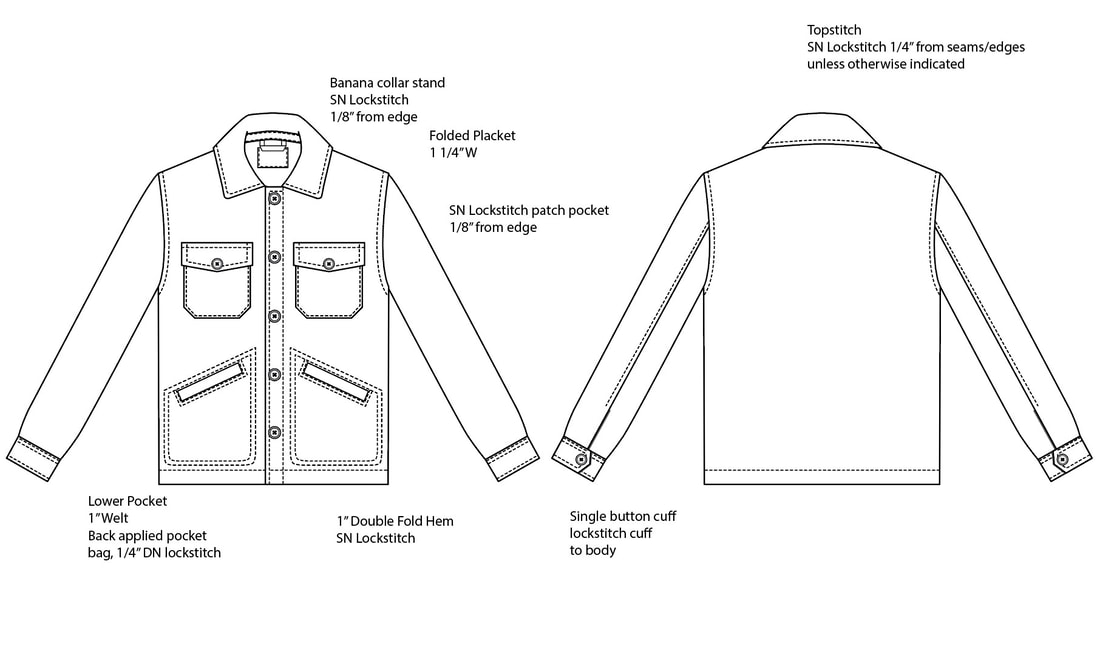 The second method to handle construction is to write the actual orders of operation and list the stitch and seam methods. This is useful when working with a cut and make only factory that doesn’t have the internal abilities to find the best construction methods. But many designers and even technical designers do not have the knowledge base to determine a full order of operations. They also may not have visibility to the machines and therefore stitches available at each factory. Bill of Materials This is a list of every component of the garment. The fabric, trims, hangtags, labels, etc. Absolutely everything should be listed. This is usually done in a spreadsheet format. The bill of materials (BOM) may specify specific sources, which is known as “closed” or may be “open” and allow the factory to select the sources. The color of each component should also be listed. The location of each component is necessary on complex garments. If there is a center front zipper and a pocket zipper listed, the factory needs to know which one to use at each location. 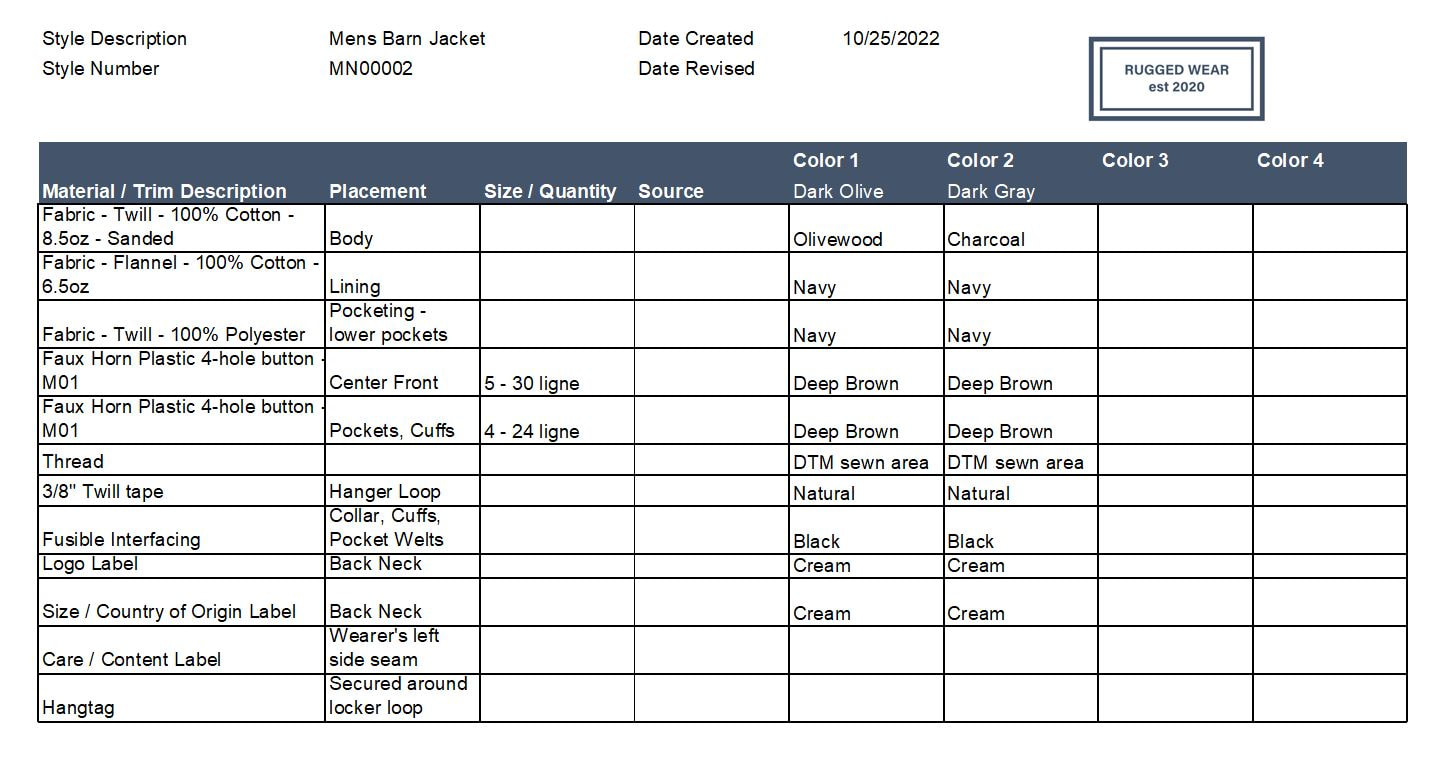 Garment Measurements The garment measurements should represent the finished measurements of the garment after sewing and any finishing processes such as garment washing to remove shrinkage. Therefore, the measurements may not match the measurements of the paper pattern. In my opinion the garment measurements should include the graded measurements for all sizes from the beginning of development. This allows the factory to accurately calculate fabric utilization and calculate the costs. As the style moves through the development process, each fit sample should be measured and the graded measurements should be revised as changes are made. You cannot control the whole fit of a garment through measurements. This is why companies focused on fit should also be reviewing patterns as part of the fit process. The final graded measurements are also used to audit the quality of the production garments. Factories may designate some points of measurements as “critical” to be audited while other points of measurement are only used for development. How each point of measurement is to be taken can be shown as an illustration in each tech pack or within a standards manual. The choice of method depends on the scale of the organization and how frequently new factories are used. Packaging and Labeling Information about how the garments will be packaged and labeled can be incorporated into the tech pack in a variety of ways. The components can be listed within the bill of materials. How to fold the garments or how to attach labels and hangtags is usually shown through sketches. Larger organizations that are packaging many styles the same way may want to communicate through a standards manual instead of including the same diagrams in a tech pack for every style. A manual can depict how to fold all knit shirts or how to attach hangtags for all woven pants. The Flow of Communication As the style is developed the tech pack evolves and changes. Usually, the initial flow starts with the designer adding sketches. The designer will then review with the technical designer, product developer and/or sourcing team. The technical designer will then create initial garment measurements. The designer may have add some information to the bill of materials stating the desired fabric, but the sourcing team will be more specific once they locate the exact fabric from a mill. Once the tech pack contains enough information it can be passed to an independent pattern-maker or the pattern-maker and development team at the factory. They will review and hopefully ask for any clarifications. Encourage questions. I would rather clarify and update a tech pack at this stage than receive an incorrect first sample. We are only human. Mistakes are common. The tech pack is a working document and will then be updated as the development process progresses. The garment measurements may change as samples are fit and adjusted. The bill of materials may become more specific as trims and suppliers are finalized. What if I Don’t Have an Experienced Team If you are a start up with a great product idea but no experience you need to find the right people. You can hire designers, tech designers and sourcing staff separately or find a firm that will help you with all the steps. Be wary of factories who say they will handle it all for you. Outsourcing work to the factory can be convenient but you can also lose ownership of the process and likely some of your intellectual property. Look for people who will create the sketches, technical packages or patterns if needed as a service. Your contract should state that you retain the intellectual property including the tech pack and patterns. I don’t want you to be the future client who tracks me down to create a consistent fit because multiple factories handled your development and you have products that don’t fit the same. If you are a designer and want to start the tech pack yourself, great. There are templates you can download or you can create your own. Know your limits. Don’t try to create graded garment measurements unless you have the experience to do so. Do I Need Product Lifecycle Management Software (PLM) If you are starting out, you don’t need to invest in software. Software systems or simple templates can be helpful by prompting you to complete all the elements of a tech pack and speed up the process. If you are only developing 5-10 styles a season, you can start with Excel or Google Sheets. Create the sketches in Adobe Illustrator and copy screen shots into the spreadsheet file. I do not recommend trying to create an entire tech pack in Adobe Illustrator. You can’t update written text and garment measurements easily. When do you want to move to a PLM system? If you are creating new styles by making changes to existing styles frequently, PLM allows you to copy and then update only the necessary information. PLM also allows you to manage elements without manually updating every technical package. For example, if you have 10 styles using the same fabric and you decide to change the fabric weight for the next season; then you only need to update the fabric information in a library and it will automatically update on all 10 tech packs. PLM systems also allow you to generate reports and track the progress of styles through the development cycle. Tips After years of working on tech packs, I can share a few tips. First, only list the information in one spot. If you stated the neck trim was 5/8” high on the measurement specs, don’t also list 5/8” on a construction image. Listing information in two or more places invites error. If you change the neck trim to ½” after a fitting and remember to update the measurement specification but forget to update the sketch; the factory won’t know what to do. Or they will waste hours e-mailing and then waiting for a response. Then you will need to update the tech pack again and resend it. Save yourself the grief and don’t repeat information within the tech pack. Be clear what was changed. If you update information, have a clear process to show the factory what changed. Remember, the activities you were given as a kid “spot the five differences”? They might be fun when you are a kid but your factory doesn’t want to spend hours comparing the previous tech pack to a revised tech pack. Your system might be to write out all changes in the fit comments. You might include a history page to track all changes. Or you can highlight and color code construction information that changed. 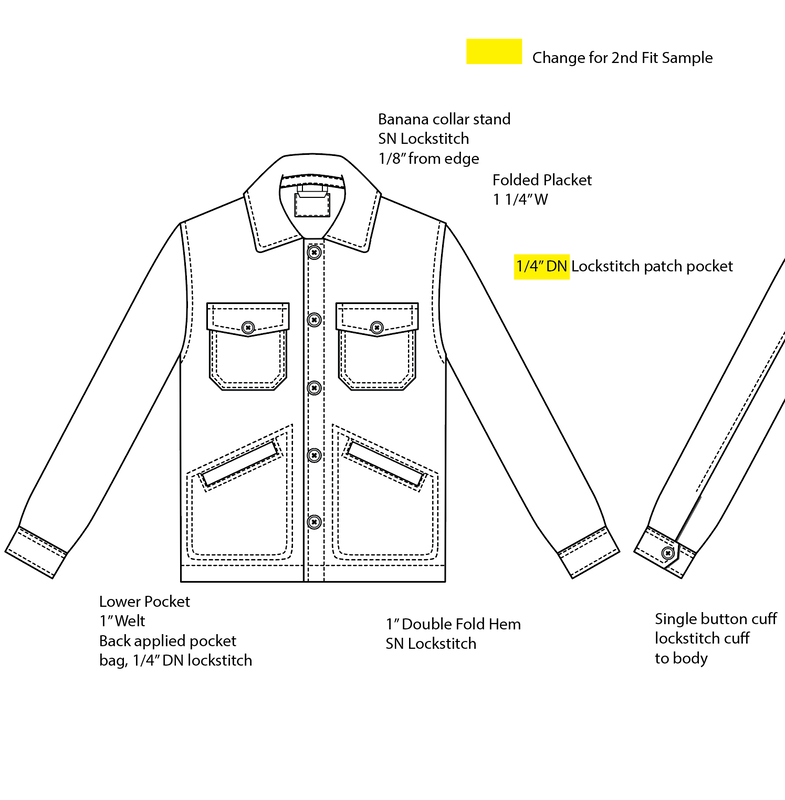 My final tip is to have a Final or Approved status that changes before the factory proceeds to production. This is a last trigger for everyone to review and proof the tech pack before manufacturing. The final tech pack becomes your contract with the factory. Ideally, you’ll have someone evaluating the quality of the products upon receipt against the tech pack.
Good luck and don't skip technical packages!
1 Comment
Clients are sometimes puzzled why an apparel pattern-maker or pattern grader asks so many questions. As a pattern grader I want to be sure your designs fit your customers. Your customers should be able to buy the same size each time they make a purchase. The work I do must be both accurate and consistent. The grade should be consistent between the styles I work on and the styles anyone else has graded for you. You might think there are hard and fast rules to grading garments. There are not. Asking questions demonstrates your grader knows what they are doing. No one is questioning the skills of a pattern grader you have used previously. We want to help you create a consistent fit. When should you worry? When your pattern grader doesn’t ask questions. If you tell them you want to run the style in women’s sizes 2-16 and the grader doesn’t ask anything before grading, that is a problem! There is no industry standard for how much each size should grade. You put in a lot of work to get to this point. You have created a garment that fits great in one size. A well graded pattern maintains the integrity of this work across all sizes. A poorly graded pattern jeopardizes all your hard work to date. Questions Your Pattern Grader will ask? What’s your base size? This is the original size the pattern was created to fit. Who is your target customer? Age? Fitness level? Ethnicity? Will the style be alpha or numeric? Alpha sizes are combined sizes, like a women’s Medium (8-10). If alpha which sizes are combined? Equivalent sizes are pretty consistent in the industry for men but alpha size equivalents for women change between brands. A women’s size Medium might be 6-8, 8-10 or 10-12. Size Charts A basic size chart like you use on your website to help your customers find the right size, tells us your basic body width grade. Unfortunately, the size chart usually only gives us basic width measurements such as chest, waist, and hip. The size chart doesn't tell me your customers are mountain climbers in which case I will grade the shoulder width differently than for a brand marketed to seventy-year-old bird watching enthusiasts. Below is a picture of a graded shirt. Each dot is a grade point. You can see the chest, waist, and sweep are only a few of the points graded.  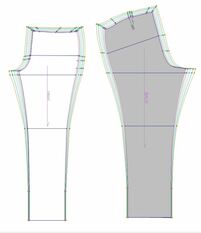 Measurement Charts from Previous Styles If you have been developing apparel for multiple seasons, you may already have a graded measurement chart for the new style you want graded. Your pattern grader should follow that chart. If not, the grader may ask to see charts from previous styles. Measurement charts are usually included in technical packages/specifications. If one person created all previous measurement charts for your brand, they should follow a consistent system. All neck widths should grade the same. All body lengths for knit tops should grade the same. All long sleeves should grade the same. More points are included than the size chart. Previous Graded Patterns The holy grail! Previously graded patterns tell us the grade points on the measurement chart but additional things like the grade distribution and additional grade points that may not be on the measurement chart. Measurements like armhole depth are not frequently included on a garment measurement chart; but help your grader more than the final armhole circumference. Reviewing the grade distribution on pants is especially important. Many people in the industry have different opinions on how much of the grade to place at the rises versus the side seams. I can achieve the same measurements as someone else but the distribution might be different. Usually the goal is to keep every size shaped the same. Occasionally we will break that rule. As an example, we may allow the front rise angle to shift if you think your customers over a certain size have a more pronounced belly. If we ask to see a previous pant you have run; we are only asking to confirm the grading “philosophy” that has been used on your styles in the past. Will we blindly copy your previous patterns? No. If we find something unusual, we will ask you about the issue. There may be a valid reason the pattern is graded that way. But we won’t perpetuate an error. Don’t Worry If You Don’t Have Answers If you don’t have the information requested by the pattern grader, don’t worry. I will gladly help my clients determine the right grading for their target market. I do charge a consulting fee for this work. I do not make the same recommendation to every client. We discuss who your competitors are and the demographics of your target market. I’ll review your competitors’ grades and size charts. I’ll review available anthropometric data for your target market. I’ll grade the type of styles you intend to create before finalizing the grade. Then I’ll create a template that all your measurement charts can be started from to maintain consistency. Sometimes we meet well established brands that have several different factories making products and they have relied on the factory for pattern-making and grading. Unfortunately, I can almost guarantee inconsistencies. Pattern-makers and graders do great work, but every grader and pattern-maker has their own methods. If you are in this situation, you need to create consistent measurement grade rules and graded block patterns. Block patterns are appreciated by graders. They can import a digital block pattern and copy the grade rules directly to the new style. Using graded blocks guarantees consistency in grading. This way you can work directly with the best factory for the product type without worries about consistency. For more information on grading visit our previous post on Reviewing Nested Graded Patterns. For more information on what a block pattern is, we recommend What is a Block from Fashion-Incubator. Copyright 2019 Fireflyline LLC Technical designers are a connecting thread in the product development process. They spend their days communicating designs to factories and making sure the designers vision is carried out. So what happens to their role as technology allows faster and easier visual communication?
I've heard some thought provoking questions lately around what skills are needed for those looking to start careers in pattern-making or technical design today. ⦁ Are companies looking for individuals with digital pattern-making and 3D design experience? ⦁ How do you identify if someone has the skills to work in Technical Design? What skills are needed for 3D pattern-making or prototyping? The beginning Let's take a step back. Technical design as a career path took hold in the nineties. As companies off-shored garment production, they realized pattern-making could also move overseas. To effectively communicate with overseas pattern-makers a new role emerged. Someone who was responsible for technical communication between US designers and the overseas technical staff. Some pattern-makers moved into these roles, but also individuals with design backgrounds who were comfortable with fit and garment construction. At the same time, the industry was beginning to take advantage of digital communication. Product specifications could be sent via e-mail in seconds instead of faxed page by page. Those with years of experience hand sketching learned to sketch with Adobe Illustrator. Digital cameras allowed images of fittings and products to be captured and transmitted quickly. Today Technical designers today range in responsibilities and skills. Some companies require adept pattern-makers capable of correcting patterns and evaluating grading. Other companies expect technical designers to communicate issues to the factories and allow the factories to determine how to correct the fit problems. Some technical designers work on only fit while others may need a strong knowledge of garment construction, manufacturing methods, quality testing, labeling regulations, color, fabric, and trims. The technology at each company ranges from creating specifications in Excel to highly customized Product Lifecyle Management (PLM) systems and 3D pattern-making. PLM software has been in wide use for many years. However, many companies have only recently began to leverage the ability to manage tasks or utilize the systems to directly communicate with suppliers. Task notifications can be sent to factories and factories can enter information directly into PLM systems. A few leading retailers have already learned the advantages of 3D design or pattern-making systems, while others are beginning to pilot systems. WhichPLM has done a great job of recapping excitement around 3D at the recent PI Apparel conference. A few roles as virtual technical designer have emerged, both within corporations and individual firms like Fireflyline. Generally, technical designers and pattern-makers are asked to learn 3D while maintaining their other duties. The future Technical design five to ten years from now will look very different from today. The development specification including measurements, construction information, and images will be gone. All this information can be condensed into a 3D file. The desired stitching can be communicated via the 3D image. The measurements, fabric, and color information can be included in the file or integrated with a PLM system. 3D software providers are beginning to form strategic partnerships with PLM providers to accomplish this integration. Currently, 3D is primarily used as a prototyping tool, but the advantages of designing directly in the system will quickly be learned. Software will evolve to make it easier for designers and pattern-makers to collaborate. Browzwear has two separate systems; V-stitcher to create the 3D prototype from the 2D pattern and Lotta for designers to review stitch details, prints, and embellishments. The role of designer and technical designer may merge. Designers will desire to use 3D modeling tools so they can adjust proportion and scale of style lines, pockets, and prints or graphics directly. Why wait to see a sample and then need to communicate to shift a yoke seam or change a pocket size? Will a production measurement specification be needed? Perhaps not. Someone may develop an app allowing depth sensing cameras or scanners to measure production garments compared to development garments or specifications. The best technical designers will be those who find new ways to use the technology available to them. Companies utilizing 3D are investing time in training staff. They are also beginning to partner with colleges to ask that 2D and 3D pattern-making be implemented into the curriculum. Individuals are realizing the breadth of tools available are not only those created for the industry but also the everyday tools they use to communicate. Smart phones, tablets, Skype, and other communication applications allow us to visually communicate with the other side of the world easier than ever. The next post will focus on training and development of apparel professionals and students to prepare them for this exciting future. |