 You have a great concept, but you don’t know the first thing about apparel development. What should you expect? Maybe you have been working with a product developer or factory but you don’t know if your experience is normal. There is a lot to know, but here are some basics.
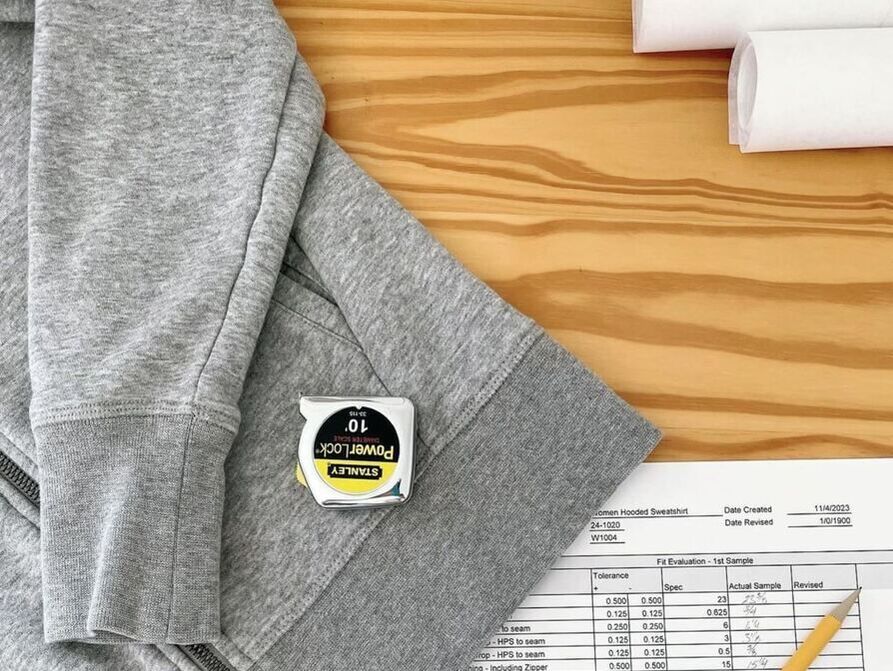
How long does development take? The timeframe to develop a product before cutting and sewing can start takes anywhere from 6-18 months. Fast fashion retailers can shorten that but if you are starting out, the development timeframe before you start production will be at least six months. You need to locate the right fabric and trims. Patterns need to be made. Samples need to be made and fit on models and then adjusted. Production needs to be booked ahead. Unless you somehow take pre-orders, this means you won’t begin to generate cash as a new company for months. Frustrating yes, but planning accordingly helps to both shorten the timeframe and stay energetic about your new venture. If you are trying to figure out the timeline for your own project this previous post on building a product development schedule will be helpful. How many samples is normal? Usually, 2-3 physical development samples are needed to work through decisions about style, fit and to validate the factory understands how you want the product produced. Knowledgeable staff and a communicative factory can help to reduce the number of samples. These samples are usually made in one size. If you want to review a size run, one sample in every size, discuss this upfront with the development team and factory. Don’t get frustrated if you are working on a collection of several styles and one piece takes additional samples to develop. Some products are simply more challenging than others. If you need photo samples in addition to your development samples or in a different size, plan those into your budget. Minimum Order Quantities Factories and fabric mills have minimums. This is an important starting point in conversations with factories and fabric and trim suppliers. The more you order, the lower the cost. As a start-up this is a trade-off with staying flexible and not spending too much cash up front. Garment manufacturers will have minimums for both styles and SKUs (stock keeping units). For example, a small batch manufacturer may have a minimum of 300 pieces per style and 50 pieces per SKU. This means if you want to run six sizes you must only have one colorway. 50x6 = 300. Or you could run three sizes in two colors and order 50 units of each. This is simplifying because usually the order will be larger for certain sizes or colors and smaller for others. Expect to pay more per unit for small batch manufacturers (low minimums). The advantage is that you won’t need to hold large amounts of inventory. You will learn quickly what sells and can then place a reorder. This is a better alternative for those starting out. You will sell more at full price and learn what your customers want. Look for fabric suppliers specializing in stock fabrics that are already produced. Be sure those fabrics are always kept in stock and available for reorder. Stock fabric suppliers will have lower minimum order quantities. They could range anywhere from 5 yards to 100 yards or more. Don’t forget to figure in shipping when determining the total cost. Stock fabric suppliers can usually ship fabric immediately upon receiving your order. Fabric mills who only produce upon receiving an order typically have significant minimum order quantities. There are good reasons for this. Setting up equipment to produce a fabric can take as long or longer than actually knitting or weaving the fabric. Dye batches for a particular color are determined by the size of the equipment. Minimums might be different depending on the weight of the fabric. If you are just getting started, meeting minimums of 1,000+ yards will be tough. Lead times can be long. Expect it to take 6-8 weeks for a custom fabric order to be produced and shipped. Development Cost Costs for development and production differ based on the complexity of the product, where you are manufacturing and the skill of the team you have assembled. Budget $2,000 to $6,000+ for developing each style. Some overseas manufacturers will fold the development costs into the quoted cost of goods. While convenient for some business models, the lack of transparency means you’ll never know what you are spending on development. If you work this way, you or someone on your team will need the skills to put together a technical package. If your factory, patternmaker, or technical designer charge you line item fees for product development and patterns; you’ll know how much you are spending. Regardless of how you are charged, a technically knowledgeable team will make the process go faster and produce a better product in the end. Service providers (designers, tech designers and patternmakers) will either provide their hourly rate or give you a quote based on your project or styles. If they provide an hourly rate, ask them for an estimate of the hours they think a style will take based on the complexity. The lowest hourly rate isn’t always the cheapest. A higher rate could mean they are more skilled and have access to additional software and tools. They may also have a network of other service providers they can help you meet. Look for service providers and factories with great communication skills. They will save you massive amounts of time in the long run. Samples usually cost three to four times the cost of goods at the production stage. If your production cost for a style is $25 for all labor and materials, each sample will cost $75 to $100. Don’t forget to calculate in shipping to get materials to the sample maker or factory and shipping to get the sample to you for evaluation. Overwhelmed If the product development process seems daunting and you are feeling overwhelmed, that’s normal. Break the process out into tasks. Set time goals for each task that will move you toward the final goal of launching your product or collection. Perseverance and discipline are the keys to making your vision into a reality. Launching any business is scary. There is an additional mental load for designers putting their art out into the world for the first time. You are exposing your vision to the world to critique. If you reach a frustration point, take a mental check of what’s causing the frustration. Then take a deep breath and tackle the next item on your task list.
0 Comments
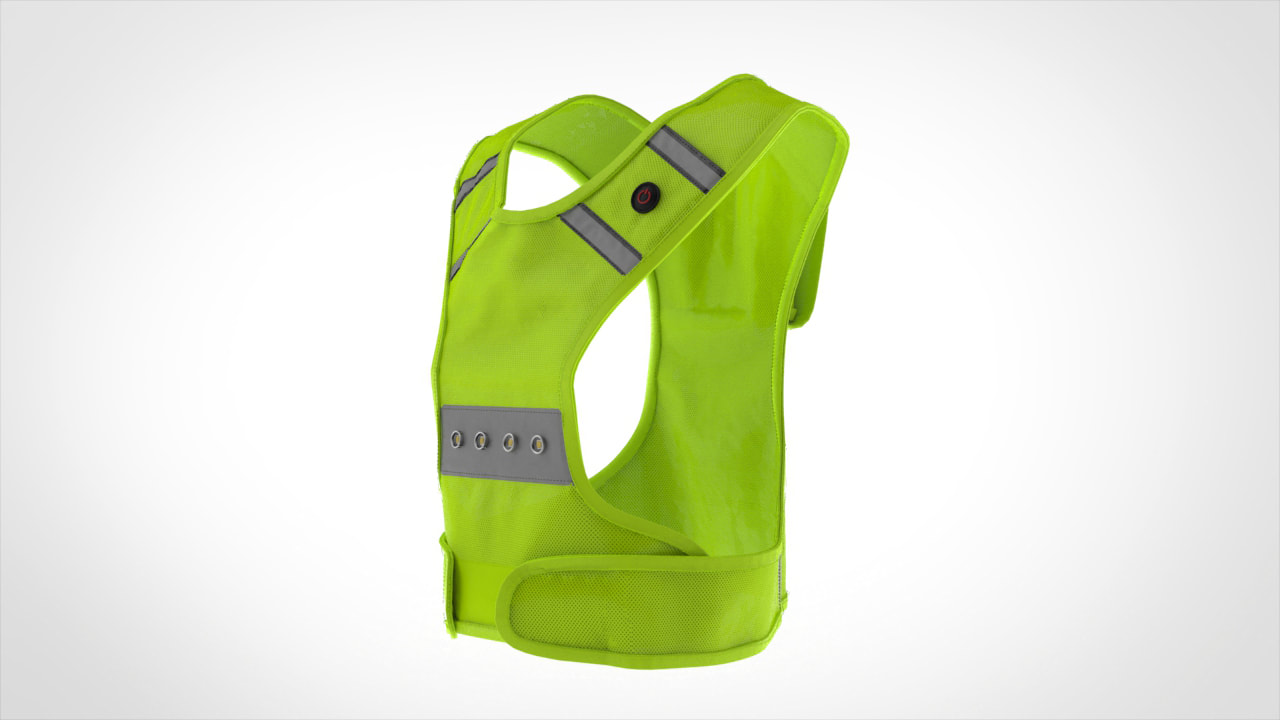 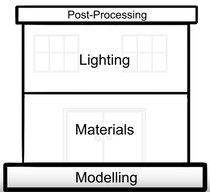 Getting to Today I launched Fireflyline in 2015 with the goal to streamline the product development process. 3D prototypes are serving us well to help clients develop the best products with minimal sampling and improve fit. 3D has become integral to the patternmaking process at Fireflyline. Basic 3D virtual prototypes allow our clients to get an initial idea if their designs are working as desired. Clients appreciate the chance to review and make adjustments before proceeding with physical samples. The design process is iterative and changes are natural. Using 3D has allowed us to move up the stage at which changes are made within the development cycle. Along the way the software we used improved and so have our skills. The virtual prototypes are looking more and more like the physical prototype. We have reached a point where the 3D digital prototype can be used as basic product photography for most apparel types. I use EFI/Optitex software for the bulk of the work to model clothing. When Fireflyline launched Optitex was on Version 15. Last fall we updated to Version 18. During that time the ability to add accurate stitching, use multiple fabric layers without layers colliding, and the accuracy of the fabric shaders/textures has all improved dramatically. Competitive software suppliers such as Browzwear and Clo3D have also made improvements during the same time period. We also stepped out of (or beyond) Optitex for some projects. Working entirely in Optitex for efficiency of development makes complete sense and streamlines the workflow. Yet, for certain projects I wanted more control over the shaders/textures, lighting, and animation. I have been using Keyshot to render models created in Optitex for select projects. There are numerous pros and cons but overall, I like the tool and the results. We also use traditional 3D modeling software to model rigid trims. Keyshot then allows us to realistically render plastics, metal, painted surfaces, and glass. The Ikea catalog is primarily composed of 3D images and has been for several years. There is really no reason why apparel companies can’t do the same for many uses. Majority of e-commerce websites now show the garment without a model for the primary shot. Building Blocks to Photorealism Most apparel companies are approaching 3D as a one stop shop. They purchase software from a single provider and expect the tool to take them from start to finish. The wisest companies realize they need a suite of tools and a variety of skill sets using those tools. I love this image featured in this video by Blender Guru depicting the four building blocks to photorealism. Creating the model of the garment takes the bulk of my time, but accurate materials and lighting are critical to realistic images. The 3D model is only the groundwork for achieving photorealism. Let’s walk through the steps used to create client Constantia Gear’s Disco vest. 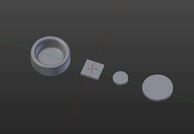 Light Components 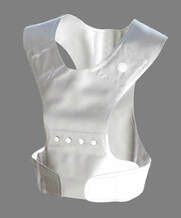 Optitex Model for Export 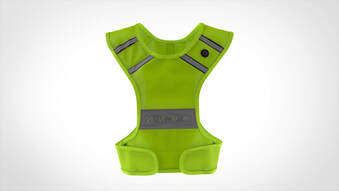 Rendered in Keyshot The lights and power button were modeled in Blender, a traditional 3D modeling software. Each component of the lights is created so that a separate material can be applied to each later. The 2D vest pattern is digitally stitched in Optitex. The hard trims are placed on the model in Optitex. The model is exported from Optitex into Keyshot. Each component of the vest has a material assigned. Colors and shaders are adjusted to accurately represent the physical materials. The appropriate lighting and environment are selected in Keyshot. In this case an indoor studio scenario was used. The lighting used for the 3D image should match the type of lighting a photographer would select for the same scenario. I never complete all steps at once. I’ll finish the model, step away awhile, and then return to do a quality check before exporting and rendering. I often come up with solutions to difficulties while I’m away from the 3D process. Innovation is hard. Not everything works. I spend a crazy amount of time experimenting. Software support staff have been great to offer suggestions to difficulties. But we are sometimes pushing the boundaries of what the software is currently capable of achieving. During this process I’m exchanging images with the client for feedback to achieve exactly what they want. Clients need to advise how they want the garment styled and the type of images they desire. (Note, the software I use at Fireflyline might not be the best selection for everyone. There are a lot of software tools available and some will work better in combination than others. If you are exploring the 3D process, look for the options that work best for you.) Are We There Yet
Have we reached photorealism? Not by my standards, but I’m my toughest critic. However, I think we have reached a point where the average consumer believes the image is the actual product. I wouldn’t currently try to replace lifestyle photography with 3D images, but for ghost photography or shots on a mannequin, 3D digital creations can be realistic. Lighting and shaders/textures look better with every experiment. There are software options available to scan or photograph actual materials to create shaders such as Vizoo and Materialize. I also experiment with altering and combining existing shaders to achieve the correct appearance. Styling the garments can be difficult. Stylists on photoshoots can pin and tweak the appearance of a garment in ways we can’t do in 3D. I cannot quickly switch between buttoned vs unbuttoned, hood up vs hood down, cuffed vs uncuffed. Those options require two completely different 3D models. Using 3D prototypes requires communication, just like the photography process. Communicating with stylists and photographers to plan a shoot requires a shot list, examples of how the product should be styled, and ideas of the mood you want to create. All the same information is required to create a 3D rendered image that you will like. Do not embark down the road of using 3D digital creation to replace photography with the goal of saving time on communication. Advantages Creating a single colorway in 3D may not offer a huge advantage over ghost photography. However, the savings will increase dramatically if there are multiple colors and fabrics planned for a single product. Ghost photography requires multiple photos be taken and several steps in post production. Generally, this must be done for every color. Adding additional colors in 3D is handled in a matter of minutes. Instead of taking new photos of a physical sample and going through the post processing steps again, I can change the RGB codes of the materials and render the new image. If you add a second fabric, the process is similar. As long as the material drapes the same, we only need to change the texture of the render. This can be time consuming a first, but as a library of materials is established the process becomes more efficient. Road Blocks to Progress I would love to see more open communication among those using 3D prototypes for apparel. The problem is usually I and others are working on styles that will not launch for six to twelve months. We cannot share the 3D prototypes with the public until the product launches and by the time we can our capabilities have expanded. I do not want to showcase what I could do six months ago. I want potential clients to see what can be done today. Majority of the images we create for marketing purposes are solely for that purpose, which is additional work. Companies are also hesitant to share because they feel what they have learned and their workflow is a competitive advantage. Fireflyline is in a unique situation because our clients come to us so they do not have to learn new skills or to get up and running in 3D faster. We also do not hesitate to share those skills with corporate clients because doing so builds strong relationships. Unlike many software systems with loads of users there is not a large user community with forums to ask questions and exchange information with peers. Peers, if you are out there and working in 3D for apparel development, please connect! 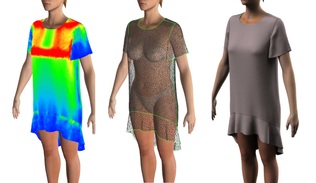 This weeks blog post is for technical designers and pattern-makers. You are challenged to create perfectly fitting garments in minimal time. The garments need to fit various body shapes, not just the fit model. Taking time to strategize how to create a smoother fit process amidst the challenges seems like a luxury. The following are some tips and reminders compiled for you.
Spend more time training There are many viewpoints on how a garment should fit. Pattern-makers are trained differently around the world. They also grow up in different cultures. Sharing photos of your fit models allows pattern-makers to become familiar with the body shape. Holding fittings via Skype or recording fit sessions can help factory pattern-makers interpret the vision of designers and technical designers. Some companies assemble a manual for suppliers. The manual contains photos of garments that fit well and represent the fit preferences of their customers. The right tools Make sure your factories are using the same tools as you. Do the factory pattern-makers all have the same dress forms as your technical designers or pattern-makers? Do your factories have access to your product lifecycle management (PLM) system? Is their internet reliable to access your PLM system? Sharing the same tools allows everyone to meet the same goals. Optimize technology There is a lot of free, dependable technology. Sometimes, we simply forget to capitalize on what is available. You can text message your overseas vendors for free with Whatsapp. Skype works great for collaboration. You can hold live fittings, share your screen and talk through photos or fit issues, or review samples with the vendor on a dress form before they are shipped to you. Advanced imaging methods, such as 3D pattern-making and virtual samples allow you to visualize your pattern in the correct fabric before proceeding with physical samples. 3D virtual prototypes can offers numerous ways to improve fit. See the previous Fireflyline post Virtual Samples vs Fit Samples. Tracking the status of styles in the development process also requires technology. The status of a sample can easily be lost in the shuffle. Virginia Meckley recommends keeping documents to track the status of styles within the fit process. “I use tracking docs that tell me where everything is at a glance. [I] color code categories for quick visual assessment of work flow and keep [the] team engaged with on going training. This gives me the flexibility to expedite and not lose time trying to find something.” Tracking documents can be created in a spreadsheet. Many PLM systems also track development status. Vendors can be given direct access to save time communicating via e-mail or retrieving large files from another location. Rushing is not always best Spending more time evaluating an initial prototype or spending the time to create a good pattern block can prevent countless iterations of samples. Waiting on correct sample yardage for the initial fit prototype can save time. Xochil Scheer reminds us “Never use muslin except as a draping tool. Even your first sample should be made in a fabric that is very similar to or exact to your final garment. If you're making a blouse in silk chiffon, muslin will never look, feel or hang the same on the body as silk chiffon.” A few days of patience waiting on information or materials may ultimately save time. Sometimes, a deep breath and a moment to think is all that is needed to create better product. If you have additional tips, please share in the comments section. Collaboration can make all our lives a little easier. |